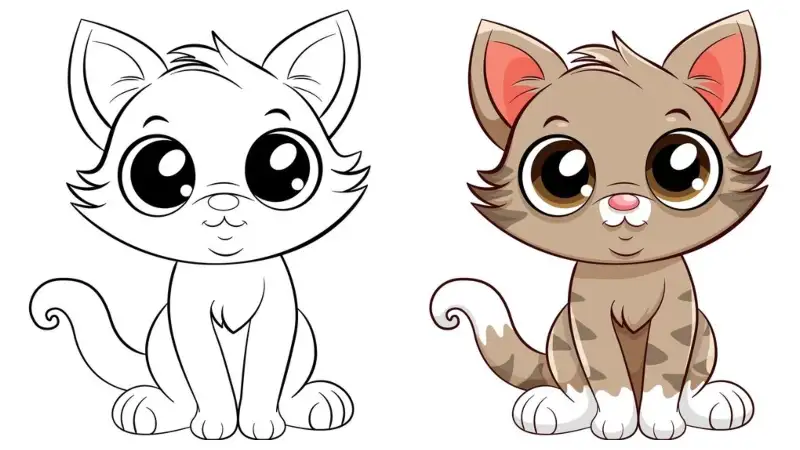
Drawing is a beautiful and fulfilling hobby that allows you to express your creativity. Whether you’re an experienced artist or a beginner, sketching a cat can be a delightful subject to work on. This guide will help you create a charming cat drawing on A4 paper using the Drawing: A4z_-Ymtkr8= Cat, which emphasizes simple shapes and detailed textures to bring your artwork to life.
Materials Needed
Before you begin, gather the following materials:
- A4-sized drawing paper
- Pencils (HB, 2B, and 4B)
- Eraser
- Blending stump or cotton swabs
- Reference image of a cat
- Ruler (optional)
Step-by-Step Guide
1. Choose Your Reference Image
Selecting a clear and high-quality reference image is crucial. Look for a picture highlighting the cat’s key features, such as its eyes, ears, and fur texture. This will guide you in capturing the details and proportions accurately.
2. Outline the Basic Shapes
Start by lightly sketching the basic shapes that form the cat’s body. Use simple geometric shapes like circles and ovals to represent the head, body, and joints. This step helps establish the proportions and positioning of the cat on the A4 paper.
- Head: Draw a circle for the head.
- Body: Sketch an oval for the body, slightly tilted to suggest the cat’s posture.
- Limbs: Use small circles for joints and straight lines for limbs.
- Tail: Add a long, curved line for the tail.
3. Refine the Shapes
Once the basic shapes are in place, refine them to resemble the cat’s form more closely. Pay attention to the cat’s anatomy and adjust the shapes accordingly. For example, refine the head shape to include the jawline and ears.
4. Add Facial Features
The face is the focal point of a cat drawing, so take your time to get the details right.
- Eyes: Draw the eyes as almond-shaped ovals, with pupils and highlights to give them a realistic look.
- Nose: Sketch a small triangle for the nose, with two nostrils.
- Mouth: Draw a short line down from the nose and add two curved lines for the mouth.
- Ears: Shape the ears with triangles, keeping in mind their position and angle.
5. Outline the Fur
Using short, quick strokes, outline the fur around the cat’s body. Pay attention to the direction of the fur growth and vary the length and thickness of the strokes to create a natural texture. Focus on areas where the fur is more pronounced, such as the cheeks, chest, and tail.
6. Add Details and Shading
Now, it’s time to add depth and dimension to your drawing.
- Shading: Use a 2B or 4B pencil to add shading to the darker areas of the cat. Gradually build up the layers, using a blending stump or cotton swab to smooth out the graphite and create a realistic texture.
- Whiskers: Draw the whiskers with long, confident strokes. They should be thin and slightly curved.
- Paws and Claws: Add details to the paws, including the pads and claws. Pay attention to the positioning and perspective.
7. Final Touches
Review your drawing and make any necessary adjustments. Erase any remaining guidelines and refine the details to enhance the overall appearance. Consider adding a background or additional elements to complement the cat and complete the composition.
Tips for Success
- Practice regularly: The more you draw, the better you’ll become. Practice drawing cats from different angles and in various poses.
- Study anatomy: Understanding the anatomy of cats will help you create more accurate and lifelike drawings.
- Use references: Always work from a reference image to ensure you capture the correct proportions and details.
- Experiment with techniques: Try different shading techniques and tools to find what works best for you.
Drawing: A4z_-Ymtkr8= Cat can be a delightful and fulfilling artistic endeavor. By following this guide and practicing regularly, you’ll improve your skills and create beautiful, expressive drawings that capture the essence of these beloved animals. Click here for more information.
Tips for Drawing
- Take Your Time: Don’t rush the process. Drawing is a skill that improves with practice and patience.
- Use References: Looking at pictures of real cats can help you understand their anatomy and proportions better.
- Practice Regularly: The more you draw, the better you’ll get. Try different poses and expressions to expand your skills.
Drawing a cat on A4 paper can be a rewarding project. With this guide, you have the basic steps to create a charming and realistic cat drawing. Enjoy the process and let your creativity shine!